Extrinsic using print
This method requires us to record a rigid charuco print where at least 7 shared markers are visible, well lit and without reflections. Device daisy chain is split into pairs and each pair is recorded individually.
The main drawback of this calibration method is the distance between devices. If the distance is significant, we must position ourselves farther away so that both devices can capture the print. However, the greater the distance, the smaller the makers appear making them very difficulty or even impossible to detect.
For print of A4 size the maximum distance between cameras is roughly around 40cm, it will vary depending on the quality of the camera and resolution.
We recommend getting a print of at least A3 size from the start and use it for both intrinsic and extrinsic calibration.
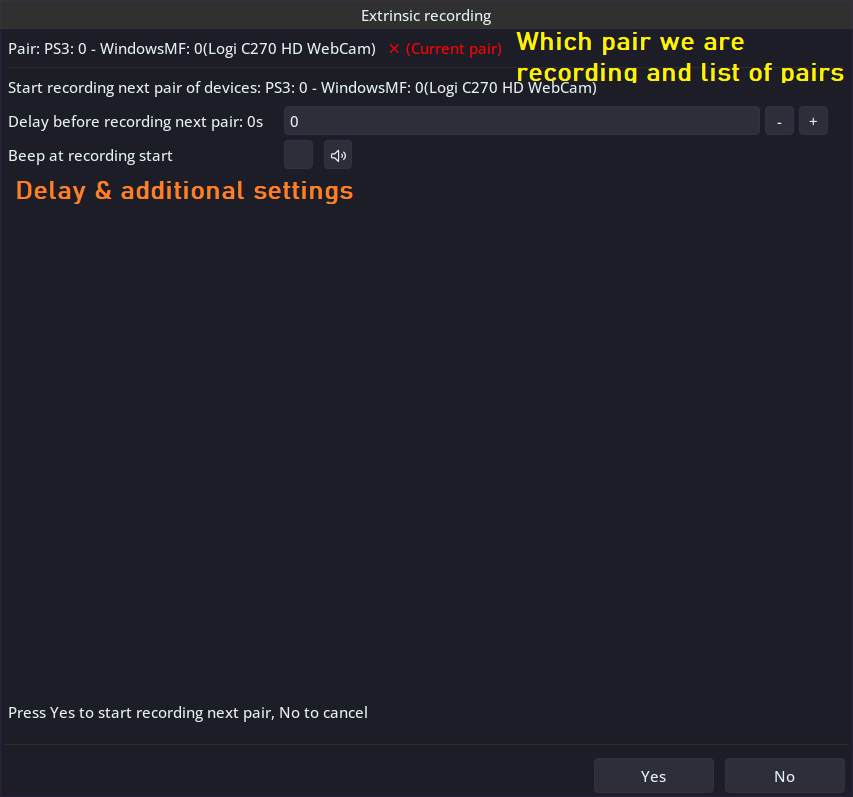
Like mentioned previously we will be recording images from pair of devices, meaning if we a have a daisy chain of 3 devices ( Device A, B, C ), we need to record the board twice. For pair A - B and B - C. Each pair is recorded individually and seperated by a pop-up, giving you time to rest and adjust.
Once we've recorded footage for each pair, last stage of the calibration will appear in the application where for each pair we need to select 10 images with the markers and squares detected and drawn over the image properly, the lines must form a square.
Step 1 - Enabling devices, alignment and camera settings
Connect all cameras to your computer and launch aimation software, then navigate to Recording tab and select Live Extrinsic mode.
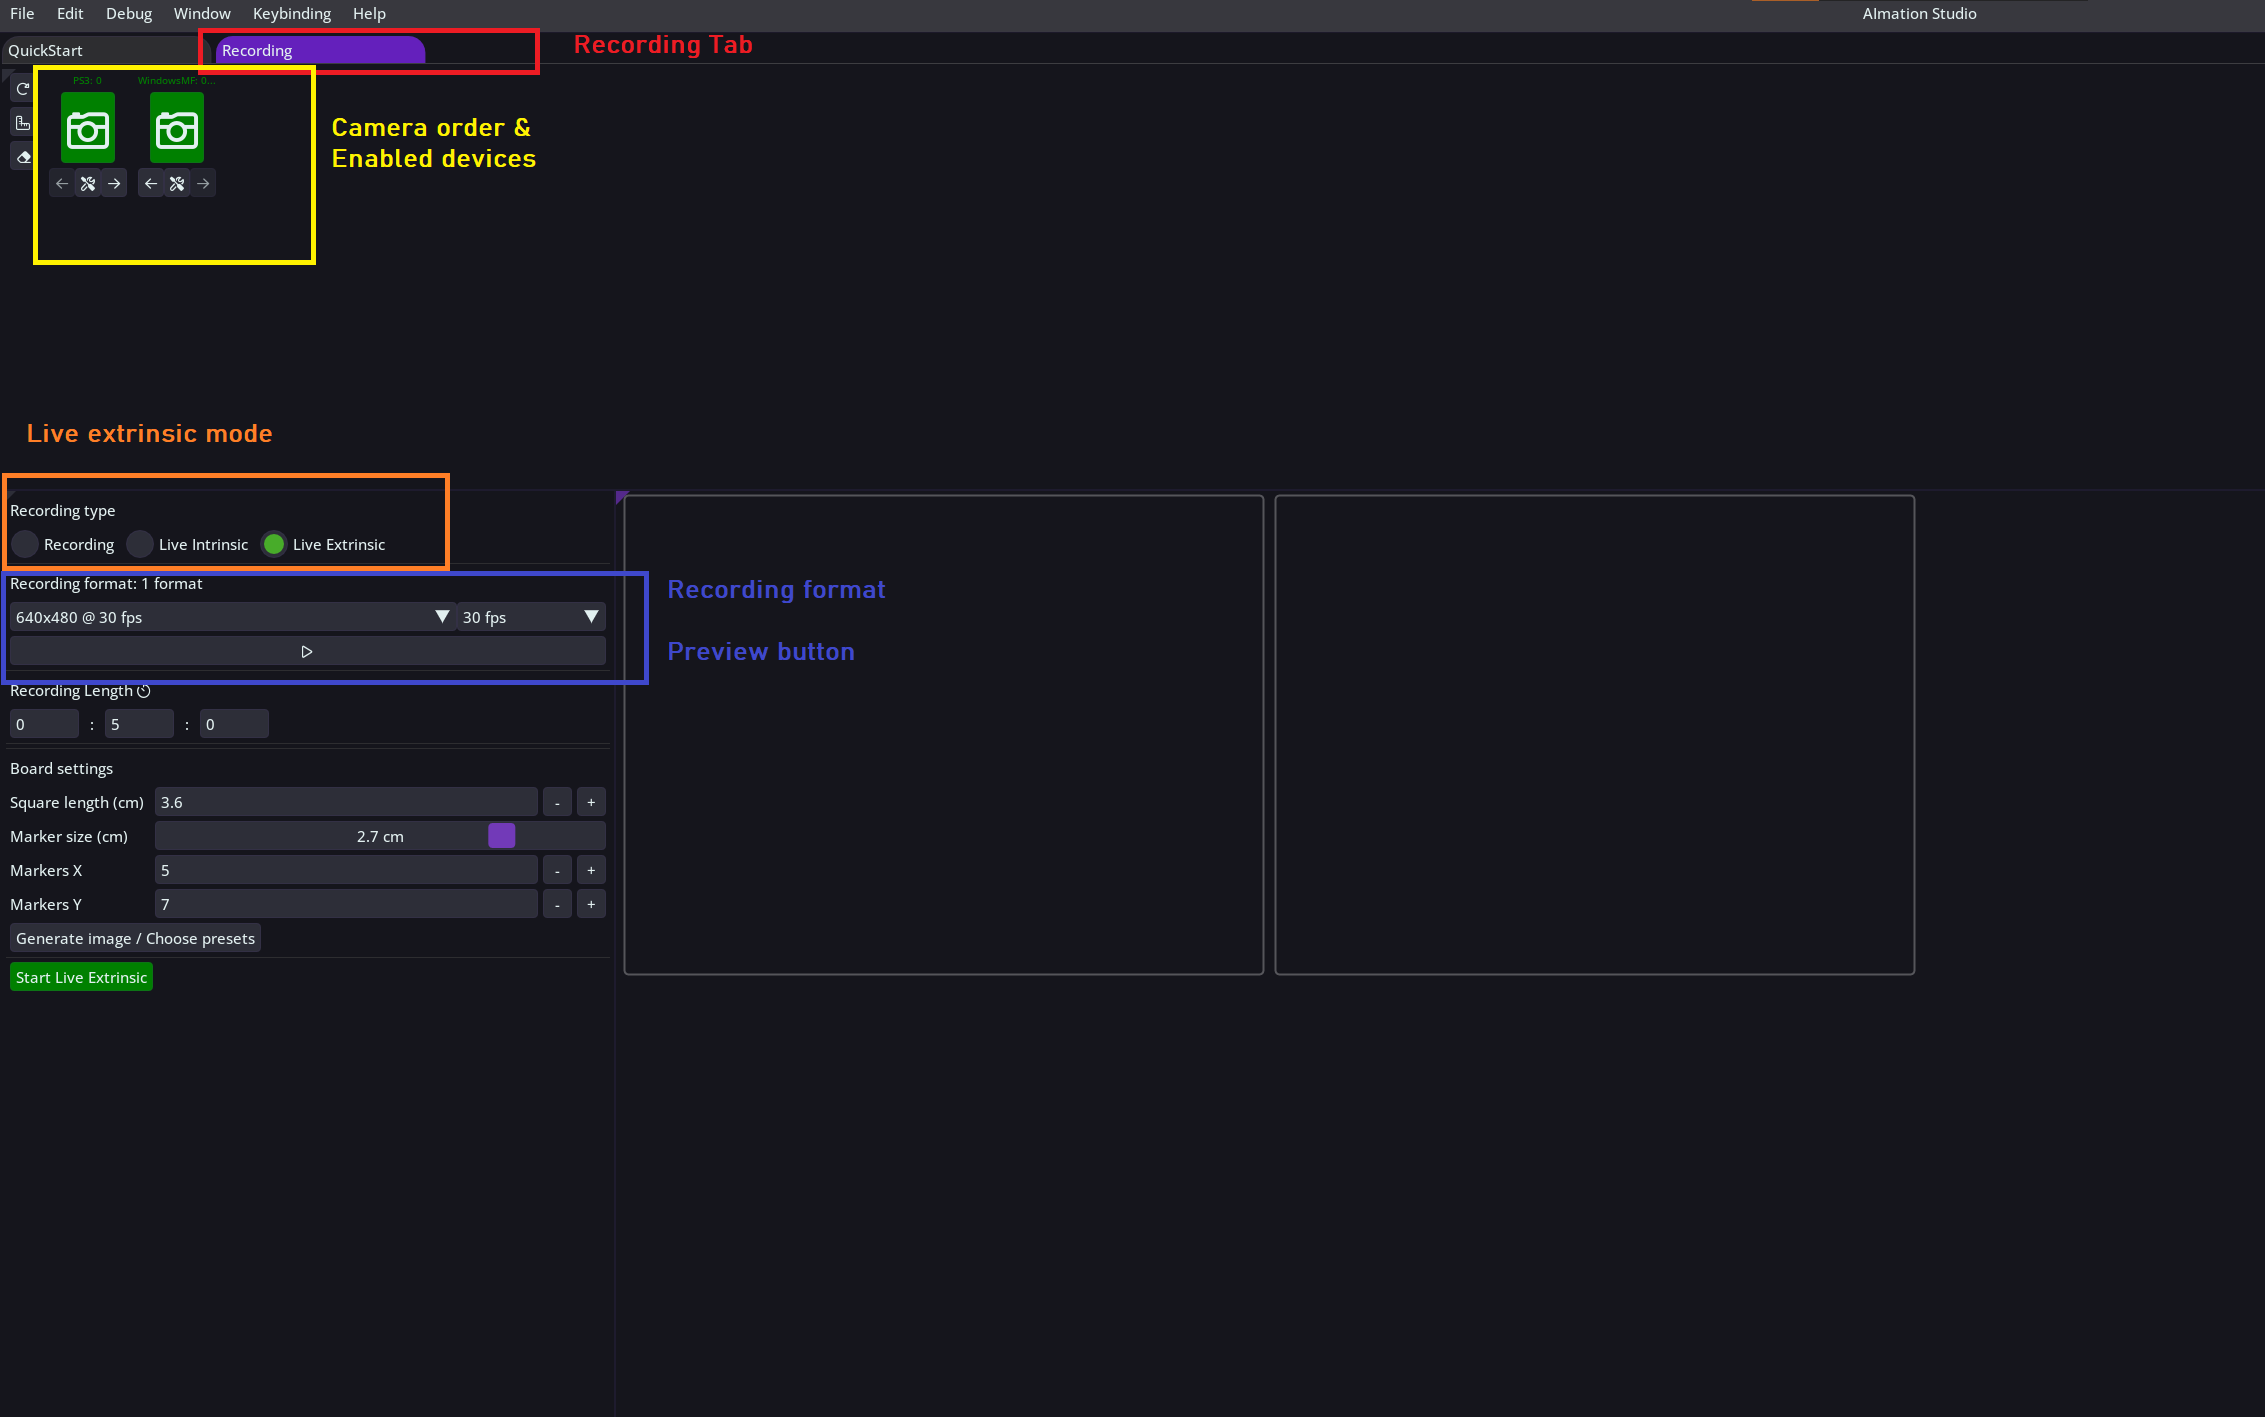
Enable all devices that are meant to record by clicking on the camera icon in the camera order part of the screen, enabled camera turns green.
Switch recording mode to Live Extrinsic mode.
Select calibration resolution in Record Format field. When multiple devices are enabled, only resolutions and framerates that are shared across all devices will be available.
Resolution set here will determine resolutions allowed during animation recording.
If you do not see vendor advertised resolution, please navigate to camera settings by clicking on the wrench button under camera and switching available image formats.
More on selecting resolutions for use-case, missing resolutions or choosing between framerate and resolution at More about resolutions [TODO link]
Launch preview by clicking on the play button below resolution selector, this will launch previews of all devices.
Depending on the device, its settings, whether frame server is enabled or not this sometimes might take a second or two. Some vendors take more time to initialize their devices and AImation Studio does not run cameras continuously and only start them when necessary.
Once preview is running we can place our devices in the world, identify one device as origin and place it in the world facing an arbitrary point in the scene and using the arrow keys in Camera Order field move it to the very first place. Place additional devices at the same height, point them roughly at the same arbitrary point and fix their position in camera order.
It is also a good time to open camera settings ( wrench button under camera icon ) and tweak camera parameters.
Auto-exposure can make your device run in lower FPS - More about camera parameters TODO LINK.
Recording length dictates how long we will record each pair for. We recommend recording for 40 seconds, giving you enough time to record multiple poses, holding briefly at each and not rushing with the process.
Input your print dimensions into Board Settings. If you've used image generated by AImation Studio you should also have a text file that contains this data.
It is good to measure squares and markers of your print to make sure everything has been scaled properly during printing.
Once everything is set up, you can press 'Start Live Extrinsic'. Recording will not start immediately. A pop-up will appear before each recording stage, giving you the option to set a delay before it begins. Use this time to rest, adjust, and view information on the remaining pairs.
Press Yes to begin next pair recording, No to cancel the entire process.
Recording the print, print movements and notes
It is very important for the print to be rigid and flat during the recording, quality of the print affects the results, if it's a paper print it might need something to prop it up. In this example print is attached to a laptop.
Position yourself in front of current pair so that the print takes as much space in the camera view as possible, optimally we want it to cover entire view but that's usually not realistic.
Once recording starts, move and rotate the board while holding it briefly at each pose for a second so that we get one clear image from both devices. Try not to shake too much when holding it. Keep doing different poses of the board for entire length of recording. We want to get as many different angles as possible.
Repeat this process for each pair.
See video below for an example.
Once the recording finishes you will be prompted with Extrinsic Picker UI.
In the modal window that appeared we are required to select 10-15 recorded images that will be used for calibration. Each item will have detections drawn over it to help you visualize.
We do this by right-clicking on the frame boxes in the bottom part of the screen, when selected a smaller thumbnail will appear so you can go back and forth between selections and other frames. If an image does not have enough detections, you will not be allowed to push it for calibration.
Proper frame is where the detections are perfectly drawn over the markers and squares and the lines are not tilted or looking imperfect.

Frames with not enough markers detected will not be available for selection. Use right-click on the numbered square buttons to add it to selections, right-click again to remove from selections. Selections can be removed by clicking on the merged image below as well. Use left-click on numbered square button or selection to navigate to that frame.
Switch pair selection by clicking for indexed pair below numbered squares ( See 'Select images for pair 0' with green border in the image above, above orange square ).
Press Calibrate and wait for the process to finish, it can take some time. Results of the calibration will be visible in the bottom-right part of the window where number of selections was displayed previously.
Each pair will have its reprojection error displayed there, aim for values around 2 and less, optimally less than 1.
Origin device will always have reprojection value of 0.
Below 'calibrate' a new option will appear to save the results with a given name, we recommend to give it a unique name so you can later identify for which system this calibration file belongs to.
After calibration finishes and you decide to add more images to any pair, it will invalidate old calibration and you will lose the ability to save it. If you're happy with the results but just wanna see what would happen, make sure to save first.
Video below illustrates the picking process.
Move onto Loading extrinsic calibration and recording your first multi-device animation!